![]()
I’ve just moved to sunny tropical Australia but all my drawing and art studio equipment is still on a container ship sailing on the ocean! I’m not going to let that stop me drawing though so I’ve set up a ‘portable’ drawing studio very economically using easy to obtain items.
If like me you are on the move, or if you just need a compact and relatively easy to move drawing space check out the ideas in this video.
Video Transcript
Introduction
00:15
I’ve just moved to Cairns in Queensland Australia and it’s absolutely beautiful. I’ve come from the UK and the problem is I’m really keen to get started drawing but my drawing studio is all in a shipping container halfway across the ocean and I want to get it set up as quickly and economically as possible.
00:36
So what I’ve done is set up a temporary studio and maybe you’ll find yourself in that situation to one day where you need to set up a portable studio that’s compact and easily affordable, so let me show you what I’ve done to solve the problem come and have a look at my studio.
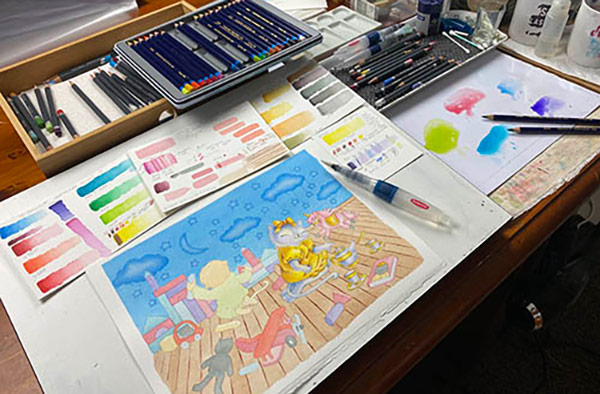
Only Four Items of Furniture…
00:50
Here’s my portable studio and I really love it. There’s only four items of furniture and they’re all portable so I can take them either indoors or outdoors and at the moment I’m outdoors right in front of the pool.
How I set up my Trolley
01:07
The four items of furniture are the trolley, my table, table easel, and my chair. Let me show you how I set up my trolley. On top I’ve got a little set of drawers and in each of the drawers I’ve got some pencils. Now these are my Procolour pencils that I’m using at the moment and I can just pull that drawer out and place it over here onto my table.
Non-Slip Mat
01:36
Now you’ll notice it in the bottom of these drawers I’ve got some lovely non-slip mat, now you can see that underneath. I’ve also got this rubbery non-slip mat on the table over here as well. Now the reason why I’ve got this non-slip mat is so that as I’m pulling my drawers in and out the pencils don’t roll around, and on the table it’s so that my table easel doesn’t slide.
01:57
Now in the trolley in some other drawers I’ve got all of my drawing equipment. I’ve got my pencil sharpeners, erasers, my pens.
It’s really just very basic equipment and I’ve got my Derwent Precision pencil there as well so that I can just sketch with that so it’s just basic drawing equipment that I use everyday.
Then I’ve got my paper and my sketch pads in there. In the next draw I have got my beautiful St. Cuthbert’s Mill paper, and what I did was before I left the UK I cut that up. I had some really large sheets and I cut it up all into smaller size sheets so I’ve got a nice little wodge of gorgeous St. Cuthbert’s Mill paper there, so that’s my really good quality paper for drawing my fine art works onto, and then in the next shelf I have my other drawing equipment which is graphite pencils and charcoal pencils you can see in there, and I have some paper stumps and some sandpaper and a sharpener.
In the next drawer I have my large tins of pencils. I’ve got my beautiful Derwent Procolor in there. I have my Derwent Colorsoft and also my Derwent Graphik pencils, so they’re all in there.
In the next shelf I just have some stationary items and in the bottom shelf there’s just some odd things down there. So that is my little trolley.
My Drawing Table
03:21
This is my drawing table and when I chose my drawing table I wanted to make sure it was light enough for me to carry but yet sturdy and strong enough to draw on when I’m erasing, and this is really strong. I just bought this from Kmart so it’s not an expensive table at all and also I didn’t want it to be too deep because if it’s too deep there’s no reason for that. I can’t reach right back anyway to the back of the table so I went more for length so it’s nice long and narrow table.
The height of it is important, this is actually a student desk so it makes it a really good height to draw at, and also I found that it was very slippery on the metal bit for my sharpener, this is my Derwent Superpoint sharpener and so what I did was I cut a little piece of this rubber non-slip mat and I just popped it on the base of the clamp so it’s nice and strong now, and I’ve used this non-slip mat on the surface so that my table easel doesn’t slip, so it’s a great length and a great width and it’s nice and sturdy.
My Table Easel
04:23
This is my table easel and I really love it, it’s just a simple and inexpensive Montmartre easel, but the thing I love about it that it’s not very complex. I have a board on top, I’ll tell you about that in a second, but notice how you can just pull this back and lay it flat so I can pick it up and carry it. It’s very light and I just find it really helpful to be drawing on an angle, and it’s adjustable so I can lean it back more, I can have it more upright.
I like on about the second loop there, so it just sits at about that angle. Then what I did was I just bought a canvas board, it’s just a sheet of canvas board, and I used that to cover the back of the table easel. I’ve got my little image clipped to it. This is just a photograph of the image that I’m going to be working on, and I’ve also attached my color swatch to it. I’ve got another little board too, another canvas on cardboard, and I’m using that to lean on for my artwork and to clip my artwork to so that I can pick it up if I need to and just carry that separately.
Then I’ve got a piece of glassine paper that I use to protect my artwork and I can just pop that over the top using that clamp or another one and that just protects my artwork while I’m not drawing. So that is my little table easel and I find it really handy and very versatile.
My Drawing Chair
05:48
The height of my chair is really important and I really like an office chair that’s nice and solid and has a good back on it, just like this one. It’s also got a gas lift so it can move up and down and I can go that a little bit higher than a normal chair. I also like it when it’s on wheels and it can turn around, so this is a really useful chair that I’ve got here.
Summary
06:11
So that’s my portable studio and the wonderful thing about it is that I can have it right here, or here, or here. And because I’m indoors I have the addition of a light, a nice bright daylight lamp so I can even work at night if I want to.
06:32
So that’s my portable studio in Cairns Australia. What about you? Have you got a portable studio or are you think you’re setting one up? If you’ve got any questions or comments, or something you’d like to share with me just let me know. I’d love to hear from you.


Great to see you are back in AUS!!!!
I have moved from Peregian Beach, where you taught me in Noosa, in 2003, back to Brisbane and now to Bribie Island!! It is PARADISE here too!! Enjoy!!
Wow Susan, its great to hear from you again. I hope you are still drawing too.
Wonderful, Cindy!
Enjoy your creation in the Australian summer!
Thanks so much Iris!
I love your trolly idea! Even if you don’t need to be portable, it is a wonderful idea. Thank you for sharing Cindy!
Thanks Stephanie!